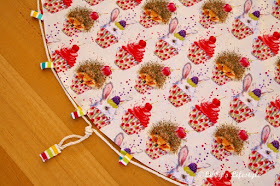
A toy sack, play mat combo seemed just the right project for MLP's granddaughter's Number 1 birthday. Yes, she's one already ... well almost, just a week to go. She's almost walking and almost talking and has heaps of toys. Her mum said the toy sack, play mat combo would be just the thing to wrangle those toys under control. So, I had a mission, a sewing mission and I set off with gusto.
Remember when she as a newborn and I wrote this blog post?
And when I made her this super, super easy padded baby play mat?
Anyway, I'd found a tutorial for a toy sack, play mat combo a while ago on Pinterest and pinned it to my "Baby" board thinking that one day I would like to make one. So, after buying my fabrics (1.5m of main and 2m of inside fabric) and rope (5+m), my mission could begin.
My fabric was 150cm (59") wide, so I needed the same in length to create a circle. For my inside fabric, I bought extra to make the casing ... luckily, as it would happen.
I followed the tutorial dutifully, cutting my main fabric into a circle by folding it into ⅛ths and using my tape measure to mark equal distances from the centre. My fabric was 150cm (59") wide, so my circle had a 75cm (29½") radius.
I used this circle and, so that both circles would be exactly the same, placed it right sides together on top of my inside fabric and cut out my second circle.
I cut 7.5cm (3") strips from my inside fabric to create my casing for the rope.
And continued dutifully following the tutorial until my toy sack play mat combo was complete.
Simple ... or so I thought.
My problem arose when I tried to pull up the cord to turn my play mat into the toy sack it was supposed to become.
The cord would NOT pull through the casing.
DAMN.
I wandered upstairs and asked MLP to have a go.
NOPE, the cord would definitely not pull through the casing.
I was devastated. My mission had been a FAILURE!
If MLP and I couldn't make it work, it would be of no use to a mum and a soon-to-be-toddler. It just wouldn't get used.
So, I did what I normally do when things go wrong.
I wept ...
no ... I slept on it.
Next morning, my decision was made. There had to be a better way.
I asked my pineapple loving friend. She had made one when her boys were small. No, she hadn't used a casing. She had used grommets.
I didn't want to go to the expense of grommets, so I thought maybe I could use tabs around the edge to feed the cord through. Would this work?
A little more research on Pinterest and I found my salvation.
This tutorial where pinksuedeshoe faced the same problem as I had with the cord and the casing concept and had come up with the same solution. Tabs around the edge rather than casing.
So, I TOTALLY deconstructed my toy sack, play mat combo. Pinksuedeshoe abandoned her first attempt, but I loved my fabric and wanted to rescue my mission.
I cut the casing and seam off (My sack, mat would be a little smaller, but hey ...) and started from scratch AGAIN.
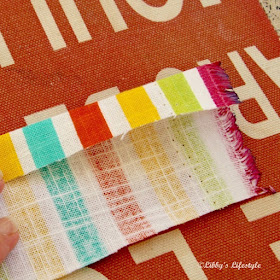
I made tabs from 7.5cm (3") strips cut from my remaining inside fabric. Luckily, I still had enough left. I made my tabs a little differently from pinksuedeshoe, mainly because I thought my way was simpler.
Fold to centre and iron.
Fold to centre and iron.
Fold in half and iron.
Edge stitch together.
Cut into 10cm (4") tabs.
I folded my circles, with right sides pinned together, into ⅛ths.
Spaced 4 tabs equally in each ⅛. (This ended up being about 15cm {6"} apart.)
To reduce bulk around the edge of the circle, I positioned the ends of the tabs side by side, rather than on top of each other, and stitched my two circles together AGAIN, leaving a reasonable sized opening for turning through.
I used triple stitch over each tab to ensure they were secure.
I turned the mat through and ironed the edges carefully.
I needed to place one tab in the middle of the opening
before I top stitched the edge of the mat.
I ran a second row of top stitching about 2.5cm (1") from the first to give the top of the mat some body.
I stitched a cross through the centre of the mat to hold both sides together.
I didn't take my stitching right to the edge of the circle, just in case my circles weren't EXACTLY the same size.
I decided on having two ends to my cord, one on either side of the circle, so that the sack could be pulled up more easily.
I finished the cord ends off with small tabs to stop them from unravelling.
And ta da ... a toy sack, play mat combo that worked ... easily! Yay!
And ... it's reversible ... should you like it to be.
Mission accomplished.
This really is a simple project,
especially if you use the tab method to begin with!
It would have taken me less than three hours to complete,
including going to the fabric shop to buy the fabric and cord,
if I had done a little more research in the beginning and
if I had chosen the best tutorial.
Catch up again soon.
Where is the Ralphter?
Sleeping on the couch in his favourite little bed ... of course.
Linking up with:


