Who doesn't love a pom pom trim? And ric rac? A little bit retro, a little bit cute, a little bit stylish. Combine that with my love of sewing and my version of the pom pom beach kimono is here.
You know I love to sew, I love the beach and I love a few pom poms. If you follow me on Facebook or Instagram, you'll have seen pom pom trim dance across the top of my aprons on a regular basis. So, a beach kimono trimmed with pom poms and ric rac was a must have on my take-to-Lake-Tyers holiday list. Aaand, while I was in the swing of things, why not make a couple more. One for my also-going-to-Lake-Tyers friend and my pineapple-addict friend.
Three at the same time. Three happy friends. I had Christmas sorted.
So, how difficult was it to make. On a scale of 1 to 10 … about a 2 ½. VERY easy.
What do you need?
Twice the length you would like your kimono to be, in a nice soft fabric of your choice.
I chose these three very light cottons, some co-ordinating pompoms and a neckline's worth of ric rac. (I used ric rac from my stash and bought everything else at my local Spotlight.)
Guess which one was for the pineapple-addict.
Let's begin.
The width of your fabric becomes the width of your kimono from tip of sleeve to tip of sleeve.
Fold your fabric in half length ways, then fold in half width ways. It should look like this.
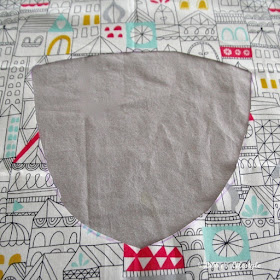
Take a marking pen or pencil and roughly mark out a curve from the non-folded top corner to the folded bottom corner. Then cut away. Like so.
After cutting, you will have a folded piece like this.
Depending on the length you want, it will more or less like a quarter circle.
Now, it's time for a neckline. I used an old T-shirt's neckline as a guide.
I wanted to have a small V shape at the front and a higher curve shape at the back.
I'm a bit crazy about covering up from the sun. You could use the same V shape for the back neckline, if you prefer.
I didn't cut yet. I copied this curve to the opposite side of the front like so.
Carefully cut this shape from one layer of fabric, then marked in my higher back neckline curve. Like so.
Then I cut the remainder of my neckline away so I had a little peek-a-boo hole in the middle of my kimono.
Using my trusty overlocker, I overlooked both the outside edge and the neckline. If you don't have an overlocker, zig-zagging these edges would work just as well.
Then came the time for the pom poms. All the way around the outer edge.
I used the edging foot which came with my elderly Bernina and it made the job very easy.
Next came my decisions about the neckline.
My initial inspiration had been this image I found on Pinterest. Merrick gives a great visual tutorial as well, if you need further details.
I wanted my neckline to be a bit simpler, so I decided to use ric rac which I simply zig-zagged around my neckline.
Ric rac and pom poms: the perfect retro combination.
Finally, I slipped the kimono over my head and pinned the sides together for a short distance so that, if I wanted, I could wear this as a top as well. I then stitched between my pins.
You can barely see the stitching. I placed the black buttons to show you the top and bottom of my stitching. (The buttons are just helping you see the line of stitching; they are not sewn on.)
So, three beach kimonos done. Simple. Quick. Easy.
So, are you ready to try your hand at making one?
Some?
Many?
They would be fun to make in children's sizes as well.
Are you a pom pom and ric rac lover?
Do they bring back memories of childhood?
Anyone remember Rock 'n Roll George in Brisbane with his pom poms around the back window of his FJ?
Please leave me a comment so that I know you have visited.


